Showing posts with label Lighting. Show all posts

March 17, 2010

Fighting Fire with Fire: a brief introduction to using light to control light

W. Eugene Smith was a legendary staff photographer for Life magazine. Concluding a lecture at Syracuse University he was asked “Mr. Smith, is the only good light available light?” “Yes,” he said and paused. A shudder ran through the crowd. That was it! No more flash! God’s light or nothing! But then he leaned back into the microphone, “By that, I mean any &*%%@$# light that’s available” (as told by Joe McNally in his book The Moment It Clicks).

Today I want to talk a little bit about how we can use light to control light. And I stress “a little bit.” Using flash is a massive subject, for which there is loads of information out there, and of which I am no expert. I have come a long way in my understanding of light and how to use it. But compared to Jeremy Cowart, Joe McNally, David Hobby, or Zack Arias, I'm just a hack with a light on a stick (but one day I’ll give them a run for their money =) ).

There are purists out there who will only shoot in available (ambient) sunlight. And I used to be one of them. Flash photography was sub-par, and to be avoided. But what did I know, I was young and ignorant. Looking back, this was not an informed decision. More than anything, I was scared of using flash, and thus, flash was bad. However, once I began to learn how we can use flash light to control available light, it opened up a whole new universe of creativity. With flash, we no longer have to avoid the harsh midday sun. Flash can control it, and we can shoot from sunup to sundown. With enough flash power, we have the ability to turn day into night (just check out this shot by Zack Arias). Once we learn how to use flash, we can become a true “Available Light” photographer, taking advantage of any light that’s available, including that hotshoe flash in our bag.

So lets get to the understandin’ part. In outdoor portraiture we have the ability to knock down the harsh sun simply by implementing a flash. Shutter Speed controls continuous light, while Aperture controls flash light. This is critical. Continuous light is controlled by Shutter Speed. Flash light is controlled by Aperture. Flash to Aperture, Continuous to Shutter. Tattoo that on your brain.

Here’s a down and dirty ‘splainin’ of how that works. Set up your flash to light your subject. Then expose for the flash by adjusting the aperture. With a hotshoe flash, you can usually get up to somewhere around f/11, depending on whether you use a modifier (i.e. softbox, umbrella etc.) or not. Then, expose for the continuous light by adjusting the shutter speed. You can darken the scene with a faster shutter speed, or lighten the scene with a slower shutter speed. Lets look at what I mean, with a real life example.

Here’s a shot of my good friend Aaron and his sister Amy. I shot both families together a few weeks back. The shoot had everything going against it. It was super windy, very cold, and in the harsh midday sun. Why didn’t we schedule it for later in the year when its warmer? Aaron and his family live north of Springfield, MO. Amy and her family live in Tulsa. Getting both families from different states available on the same day I was free for a shoot, was near impossible. We’d been trying to book a date for months. Finally a day in late January looked to be our only choice. Between the two families, there were five children under the age of 5, two of which were newborns. Starting at noon was the only nap-free time of the day. So noon it was. Here’s what the available light was allowing:

© Todd Walker ~ without flash

Shot at ISO100, f/6.3 at 1/250th. Harsh and nasty. Luckily though, I’m an available light photographer. I also used an SB-800 flash, because I had it available =). Knowing that adding flash can nock down a harsh sunlight, whipped it out, set it up, and started shooting. Here’s the result:

© Todd Walker ~ with flash

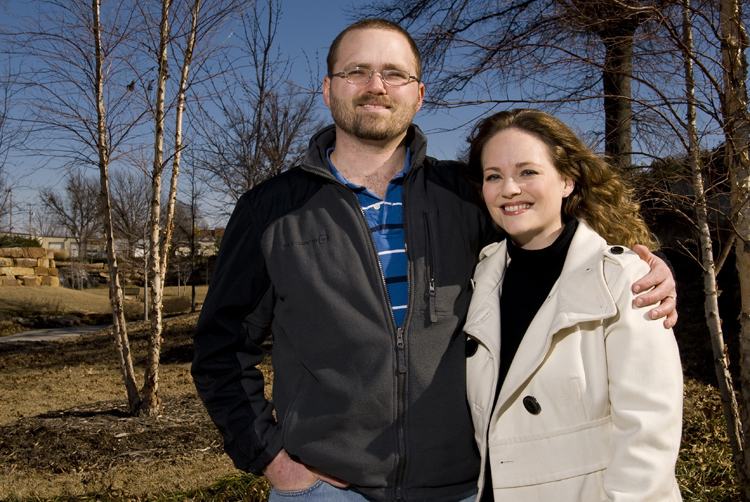
ISO100, f/11 at 1/250th. Much better balance. Not perfect, but a heck of a lot better than straight sunlight. Notice the smoother skin tone, the lighter shadows, and the deeper blue sky – all captured IN CAMERA. No photoshop needed here. And it saved countless hours and headaches trying to fix these problems later in post production.

Occasionally we will find ourselves shooting in a situation that is less than ideal. Having the knowledge and tools to adapt will allow us to capture our vision even in the poorest environment. The key to this technique is to properly balance the flash with the ambient light. If not properly balanced, the image can look unnatural. So be careful of that.

This post is only the tip of the iceberg, so to speak. A mere introduction to what is possible when we use every light that is available to us, including flash. Much of the time, the existing light works great for an image. But many times, what’s there simply won’t work. In these situations, having the know-how to control the environment with flash can allow us to create images otherwise not possible. For more information about this technique I highly recommend you check out David Hobby’s Strobist website, or Zack Arias’ Onelight Workshops and/or DVDs. Heck, even Popular Photography even has a post about it. As a creative, you owe it to yourself to at least explore what flash has to offer. It might just kick your photography to a new level.

Now, go out and shoot something!

February 17, 2010

QUALITY OF LIGHT ~ Specular / Defuse

© Todd Walker
Whether you use the sun or a flash, as a photographer, understanding light will be a lifelong pursuit. You could study from sun-up to sun-down everyday till your grandkids have grandkids, and you’d still have a lot to learn about light. Albert Einstein once said he could spend his entire life trying to figure out what light is (loose paraphrase). I'm not an expert on lighting. And there are volumes upon volumes of books written on the subject of lighting. There are plenty of photographers out there who put my lighting skills to shame. But, for the sake of the industry, and for those of you reading this, I’m going to share a little bit of what I know about light. Hopefully you can gain something and be able to use it in your own pursuit of photography.

Without light, there is no photograph. The word itself literally means “light drawing” – “photo”=“light” and “graph”=“drawing”. What separates a great photograph from a mediocre one? The quality of light. The subject in the photograph may help a little, but the true difference will always be lighting. You can take two photographs of the same subject, one poorly lit, and the other well lit. The outcome will be completely different. Same subject, same pose, one looks awesome, and one looks like it needs a courtesy flush. The great Joe McNally says “Light speaks, just like language. You can make someone look like an angel, or the devil.” Light allows you to bring your vision into being. Light is photography. Not Nikon or Canon, not Photoshop or Lightroom, not actions or presets. Burn it into your brain. Photography is light. Light is photography. And recognizing good light will be the single greatest advancement one can have as a photographer. Some have the God-given ability to recognize it. Others have to work hard at learning to see it. And we all would do well to spend our time learning to see and use good light.

So what is good light? Well, good light is . . . relative. That’s right, no silver bullet here. Good light is completely dependant on the vision you have for your subject. Say you want to shoot a beautiful portrait of a woman. You want the shot to be soft, airy, serene. You will never get that shot if you are using is harsh, contrasty light. Or say you envision something edgy, dark, and dramatic. Won’t happen if your light is soft and creamy. We need to understand light. Not megapixels. Not Brands. Not bokah. Lets say it again class: Light is photography. Photography is light.

To understand how to capture our vision, we must first understand a couple of different qualities of light. The first quality of light is known as specular light. Specular light is what gives us high contrast and sharply defined shadows. Its often referred to as harsh light. Specular light comes from a very small light source. Think of a flashlight. If you are in a dark room and turn on a flashlight, you get a lot of contrast and well defined shadows. Another example is the noon-day sun on a clear day. The sun is relatively small, a mere dot in the sky. And from that small light source, you get lots of contrast and crisp black shadows on the sidewalk. To achieve harsh, contrasty light with well defined shadows, you need a specular light source. The light needs to be tiny.

The second quality of light is known as defused light. Defused light is what gives you the creamy light with low contrast and very soft shadows. Its often referred to as soft light. Defused light comes from a very large light source. Think of a picture window. If you are in an otherwise dark room and the daylight comes in though a picture window, you get low contrast and soft shadows. Another example is the noon-day sun on an overcast day. The sun is illuminating the clouds and thus the entire sky is the light source. The light source is relatively huge. And from that light source, it gives very low contrast and extremely soft shadows. To achieve soft creamy light with soft shadows, you need a defused light source. The light needs to be huge.

One thing to mention here is the brightness, or luminance. Brightness has no effect on whether the light is specular or diffused. Think of it this way. In a pitch black room, light a single candle. This is a very small light source. It is also very dim. Now, in the same pitch black room, turn on one of those LED key-chains. You know the ones that have a single LED sticking out so you can see a keyhole better. Its about the same size as a candle flame. But it is much brighter. And both create very high levels of contrast and deep black shadows. Their brightness levels are very different, and they will illuminate a subject to very different degrees. However, since they are both very small, they are very specular in nature. So again, it is the SIZE of the light source that determines specular or diffused light. Not the brightness.

Now, the quality of light ranging between specular and defuse is a sliding scale. Its not an “either/or” option. But knowing the differences between the two extremes is a great place to begin. Say you’re shooting outside on a sunny day. You want the light on your subject to be softer than what the sun is giving you. You know you need to diffuse the light a bit. The sun is a small light source (specular), and to diffuse it you have to make it larger. So how do you make the sun larger? By cheating. A handy thing to have in your bag is a large 5-in-1 reflector. One of the “colors” in the reflector is translucent. You can place this between the sun and your subject. The translucent reflector is illuminated by the sun which now becomes your light source. And the reflector, being much closer to your subject, is relatively much larger than the sun (The bare sun is a small dot, the reflector is several inches across). You have re-created a similar effect to an overcast sky. You now have made the light on your subject softer. It may not be as soft as if it were actually overcast, but it’s a heck of a lot better than direct sunlight. Now, am I saying everyone needs to have a 5-in-1 reflector? Not at all. I’ve used one a total of one time. It simply doesn’t help me achieve my photographic vision. But if it would help you achieve your vision, then by all means, use it. This is simply one scenario and one solution. You get the idea. Have a vision. Assess the situation. Set it up. Press the button.

Today, I have a homework assignment for you. Go to any of the mass photo sharing websites out there (my favorite is www.photo.net). Once you’re there, take some time looking at the type of photos you enjoy. I like portraiture. As you look through them, you’ll come across those that stop you in your tracks. When that happens, don’t just move on. Take the time to study those images. What made you stop and take a longer look? Why do you like it? What type of light did they use? Specular or defused? Then post a comment her on the blog with a link to the image and let us know your thoughts on it.

Now, go out and shoot something!