Showing posts with label Your Questions Answered. Show all posts

May 13, 2010

Your Questions Answered...

© Todd Walker

If you’ve been following this blog for any amount of time, it’ll come as no surprise that I really want to help other photographers improve. As much as my schedule allows, I’ve tried to pass on as much help/info as I can. For this week's post, I’ve been asked a number of questions that can be lumped into the same pile. I’ve gotten a barrage of “What blogs are you following?” “Who do you learn from?” “Who do you gain inspiration from?” etc. In other words, I’ve been asked “what do you do to keep up with the photography industry and sharpen your skills?” Well, here’s the skinny on this part of my photoggin’ leranin'.

Let me start off by saying, I put the greatest amount of effort on my family life. I strive to be the man, husband, and father that my family needs. If it were to ever come down to choosing between photography and my family, I’d leave photography in the dust and never look back. I carefully and consciously strive to daily guard my family life. Keep this in mind as you read this post. It can sound like I spend every waking moment reading, studying, and shooting. But I strive to keep a balance between what I do, and who I am to my family - and I tend to lean towards the family side of this balance. Having said that, here’s what I am currently putting into the learning side of my photography.

First of all, I read and ingest as much as humanly possible concerning our craft. I read and study constantly. The internet is a beautiful thing. There is so much good it does. And the proliferation of knowledge is some of it. Land a commercial job photographing custom leather baby shoes, and not know how to light it? Google it, and you’re overloaded with multiple lighting scenarios that’ll help. Get to shoot a model’s portfolio and need some pointers on how to use the only light you have? Search it on Youtube and you’re inundated with videos showing various ways to accomplish a fashion shoot with one light. I recently shot for a new restaurant that opened here in Tulsa. Having never photographed food, I first called a commercial photog friend of mine for pointers. I then quickly hit the web. After a short serf around the net and I was able to walk into the shoot with confidence and accomplished it with peace of mind. The client was ecstatic with the results. So the internet is an invaluable tool in my photographic arsenal. But what about all the other time, when I don’t have a “special” shoot coming up? There are several things I do to continue to learn.

There are several blogs I follow. I have chosen them because of 1) they offer so much in the way of learning, and B) they offer a great deal of inspiration to me. So what ones do I follow? Here’s a few who have made my RSS feed:

zarias.com ~ You’ve probably heard me talk about this dude before. Even though I went through a two year photography school, what I have learned from Zack has revolutionized my photography. School was great for the basics, but what Zack has given away on his blog allowed me to take what I knew and catapult me to another level. He’s one of the present-day lighting gurus. But the biggest thing he offers me is not technique, its inspiration. I’ll not retype his story here, but in short, early on he lost everything, and found himself working at a Kinkos, having to sell all his gear just to pay rent. But it was from there the dude pulled himself up, headed out with a borrowed camera and speedlight, and built a hugely successful career, all without going into debt. Just knowing there’s a regular guy out there who has successfully built a career doing what he loves, is able to provide for his family, and give back to the photography community, gives me a great deal of inspiration to keep going. So, I always read what he has to say.

pixelatedimage.com ~ David is another photographer that has a spot on my RSS feed. Talk about inspiration. First of all, the guy is doing exactly what I aspire to do: travel the world using his camera to work for non-profit organizations. When I was a kid, I wanted to be Indiana Jones when I grew up. I wanted to travel the world in grand adventures, fighting off bad guys. Now that I’m grown, not much has changed. Now I just want to have a camera in my hand. I would love to work with/for organizations like “For the Silent,” “Compassion International,” or “Voice of the Martyrs.” I want to create images that help them further their respective causes. And this type of thing is exactly what David is doing. He’s traveling the world shooting for some great causes. And his blog is constantly updated with very worthwhile posts, offering very sound food for thought on our craft. He has also written several books that I HIGHLY recommend. The most recent one I’ve read is “Visionmongers” ~ An absolute must read for every photographer trying to make a buck IMHO. If you haven’t already, check out his blog, its worth it.

jeremycowart.com ~ Relatively new to my RSS feed is this dude Jeremy. I don’t know much of his background, but he’s another that is very inspirational to me. Last year he is responsible for creating the Help-Portrait movement. This was a grass roots movement of photogs all over, volunteering their time and talents to take family portraits for families who otherwise couldn’t have any made. Around Christmas-time, there were something like 40,000 families around the world who received family portraits for free from photographers around the world. More recently, Jeremy traveled to Haiti to create his Voices of Haiti Project. While there, he created portraits of earthquake survivors. He is now selling these images and all proceeds are going directly towards Haiti disaster relief. It’s a VERY powerful collection of photographs. Plus, the dude is simply an awesome photographer. I love to look at his work.

noireblanc.com ~ I follow Beki’s blog for a couple of reasons. A) she’s an incredibly talented young photographer. By young, I mean, she’s only 17 years old. But, regardless of her age, Beki creates some of the more beautiful nature/macro photography I’ve come across. She’s also quickly become a Queen of Black and White. I have a lot to learn from her concerning BW photography. And 2) Beki is a friend of mine. Though I’m a little biased because she’s my friend, she really is an inspiration. At only 17, she is quite accomplished in her photography skills, is a very creative designer, and maintains a blog that is loaded with stunning images, photography techniques and design ideas. She is one to keep a close eye on. Her career is just starting to blossom. (did you catch the macro pun? Close eye... blossom... um, okay, moving on...)

scottkelby.com ~ Scott is the world’s foremost expert on everything photoshop. I could write forever on what he brings to the table. His blog is updated daily, loaded with tons of industry news, photography techniques, and of course, photoshop stuff. Scott has also written a plethora of books on photography and photoshop. He has another site called kelbytraining.com where members have access to a sea of online photoshop classes. He even has his own online "tv" station at kelbytv.com that airs webisodes teaching photoshop and technical camera stuff. If you’re not familiar with him, you owe it to yourself to get acquainted with what he does. He's like the Michelangelo of modern photography - he's everywhere creating impossible amounts of photography realted stuff.

Here’s a few more on my RSS, since you asked =)…

strobist.com ~ Everything you ever need to know about using hotshoe flashes.

joemcnally.com/blog ~ Joe is the Kung Fu Master when it comes to lighting.

digitalprotalk.blogspot.com ~ This one I just found out about… I haven’t spent a lot of time on David’s blog, but so far, it seems to be loaded with tons of great information, largely aimed at wedding photographers. If you’re into weddings, you may want to check into this one.

One other site I want to bring your attention to is creativelive.com. I’m just starting to learn about it, but I believe this will completely revolutionize the photography industry as we know it. Simply go to the site. Sign up for free. And then, you are able to “attend” live workshops FOR FREE. And there are some amazing workshops being offered. For instance, Zack Arias is conducting a three-day workshop in June. All you have to do is log on and participate. Catch that? Everyone who is “attending” the workshop is able to ask questions to the instructors, as they are conducted LIVE. Not available for the workshop you want to attend? No sweat. Once a workshop is over, you can purchase the workshop and watch it at any time. This is how they offset the cost of the website. In short, watch all the live workshops you want for free. Then, if you miss one and its worth it to you, you can pay for it. Its that simple. This is an amazing concept brought to us by the genius known as Chase Jarvis. I am pumped about it!

So there you go. There’s a short list of where I draw photographic inspiration and knowledge. Check ‘em out. Maybe they can give you something that will help you along on your journey. That’s it from me for this week. Have a good weekend everyone.

Oh, one more thing I want to add. Even though I spend a great deal of time studying, it doesn’t do any good if I don’t get off my backside and get out and shoot. There’s a deliberate reason I end every post telling you to go shoot. As much as I want you to learn something here, my goal is to get you out there and shoot. Do all the “book” learnin’ you want, but there’s no substitute for experience. Soooo...

Now, go out and shoot something!

April 29, 2010

I'll sell you the Mona Lisa for $1

© Todd Walker

So you've decided to make some money with your camera. To do that, you have to take pictures for people, and you have to charge a price for it. So where do you start? How do you determine what to ask for the work you do? When it comes to the business side of photography, this is the number one question I've been asked. It's a hard one to answer. There are just so many variables involved, its nearly impossible to answer. Everyone of us has a different style that appeals to a different market. We live in various places serving very different demographics. Different markets will tolerate different rates. To an extent, each one of us will have to figure out what we will charge for our photography. Being relatively new to the industry, and having to have figured this out for myself, I do have a few thoughts on the subject. I could go on and on about it, but hopefully I can at least get you thinking.

When starting out, it is easy to think that price alone give you the edge over your competition. "If I can just undercut Frank's Fabulous Fotos, then I'll get some of his clients." Its natural to think this way. So much of our materialistic culture is based around this ideal. Think of it this way. Say there's a small-town hardware store that sales a particular power drill for $200. But down at Wal-Mart you can get the exact same power drill for $150. The same exact drill, made by the same exact manufacturer, but at 3/4 the cost. That's a no brainer. But photographers aren't in this game. The photography you offer is not, and never will be, the same as anyone else's. You view the world in a particular way, possess a particular shooting style, and produce a unique photograph. To think that what we produce is exactly the same as what everyone else produces is ignorant. We aren't manufacturing a widget. We are creating art. And since we are not producing the exact same thing as Frank down the street, we shouldn't be competing on price alone.

If we ever get into a price war with photographers around us, it won't be long before all of us are out of business. I work part time at a retail camera store. We sell some of the exact same items found at other stores. Competing on price alone, we can lower the price on these items to barely above cost, or even below cost, in order get customers in the door. The hope is we can then sell other items that have much higher profit margins. We may loose a couple bucks on one thing, but profit fifty on another. The reason you can't do this as a photographer is simple. There is only one of you. You only have one thing to sell. If it we compete on price alone, we would have to lower our prices over and over until we are charging less than what it costs us to be in business. Game Over when this happens. And there are so many photographers in the industry who are doing this very thing. And many more who have gone under because of it.

Have you ever walked by the portrait studio at a Wal-Mart and seen how much they charge for a portrait package? Here its something like 30 prints for $9.95. Ever done the math on that? The prints lone would cost me much more than that. And that's not considering my time to photograph the family, edit the images, the wear on my equipment etc. At $9.95, that's massive loss for someone who can't also sell the family a flat screen TV for a large profit. It may be different where you are, but I can't pay my bills with a negative cash flow. So how do we compete with Wal-Mart? Simple: you don't. Nor should you. What you produce should have so much more value than what Wal-Mart has. I know that people can get 30 prints for $9.95 there. But I also know that they can come to me and receive much more value for their money. "Say what? Your sitting fee alone is nearly 13 times Wal-Mart's entire package price. How in the world is that more value?!?"
David duChemin wrote, "Value is not determined by price. Value is about what the client gets for the price paid. If I pay $100 and get nothing, that's not value. It's cheap. If I pay $1,000 and get much more than I expected, that's not expensive; it's value. And when you consider this way of thinking, it's easy to see how competing on price can lead a client to look at your pricing and ask the question, 'what's wrong with their service? Why are they so inexpensive?' Repeat after me: 'I can't compete on price alone.' Is pricing important? Yes. Will clients consider the price? Yes. But if you need to lower your prices until you are bankrupt, then these are not clients you want and you should find a new market... the clients who are worth keeping want value."

Instead of worrying about what others are charging for their work, we should be building value into our own. Put simply, charge cheap rates, and you're perceived as cheap. Add to what your clients receive for the money, and you're seen as valuable. Think about it. Say you have a newborn daughter. You want portraits taken of your beautiful little girl. Money is no object. Do you go down to Wal-Mart for the $9.95 package, or do you higher Anne Geddes and pay her whatever she charges? Somehow, having your child photographed by Anne Geddes seems so much more valuable than being able to pick up some milk and a new shirt on the way out of the studio.

Get where I'm comin' from? The value of your work is perceived. Many of us are very good at creating the images we do. However, way too many of us charge way too little for it. Granted, some simply don't have it, and need to move on to something else. I tried to play the guitar for years, and finally gave into the fact I simply didn't have it. Bt for the rest of you, those who are shooting good, solid photography, need to recognize the value of your work. Charge $9.95 and your work won't be perceived nearly valuable as if you were charging $1500. Also, you will attract certain clients based on your perceived value. A $9.95 photographer will attract $9.95 clients. A $1500 photographer will attract $1500 clients. This all should play into your thinking as you determine what to charge for your photography.

One more thought before signing off. If you have decided your photography is unique, has value, and are charging a good amount for it, then what you create better back up your prices. These two things, the work you produce and the amount you charge, go hand in hand. Anyone would gladly pay $9.95 to have their newborn photographed by Anne Geddes. That would be an incredible value. But no one in their right mind would pay Wal-Mart what Anne Geddes charges. That would be a rip off.

If you say you can give something of high value for really cheap, people will question its value. If I were to tell you I'd sell you the Mona Lisa for $1, all kinds of red flags would go up. "Is it the real Mona Lisa, the one that is worth so much more than a dollar? What's wrong with this deal?" But if I were to tell you I'd sell you a great painting for $1000, and gave you the Mona Lisa, you'd think you got a great value for your money. Work on your craft, charge what its worth, produce great images, and add value where you can. You are an artist, not a peddler of power drills. You cannot and should not compete on price alone.

So there you go, 1348 words about pricing your work. This is a massive subject, one I am still learning. I could never do the topic justice in a blog post. But hopefully I've given you something to think about. Whatever you do, don't undervalue your work. It is worth so much more than you think it is. Do your research, think it through, and charge accordingly.

Now, go out and shoot something!
March 27, 2010

Your Questions Answered: What's your post production workflow?


One of the most important aspects of our craft is a good post-production workflow. A poor workflow can drive you crazy. If you're trying to make money in photography, you can waist a lot of time with a poor production workflow - and time is money. The more efficient you are with your post production, the more time you'll have to do other important lucrative things - building relationships with clients, making contact with potential clients, working on your skills, creating more images, and the list goes on. Being stuck at your computer keeps you away from some very important stuff.

The thing that has streamlined my post production workflow is to pursue capturing everything I possibly can in the camera. I am passionate about this pursuit. If spend the time on a shoot to capture my vision in camera, then I won't have to spend that time later in post. I've found slowing down to fix problems during a shoot is time well spent; while waiting to fix problems after the shoot at the computer becomes a time waster. Its inevitable. Happens every time.

Here's a quick look at my workflow, start to finish. Shoot the images. Copy the images onto two hard drives for backup. Load the images into Lightroom. Delete the clunkers. Then adjust the keepers. And I use the word "adjust" deliberately. Since I've done what I can to get 'em right in camera, I now only have to do minor adjustments to exposure, color, contrast, etc. I usually spend only a couple of minutes tops on an image. After that, some of the images may still require some photoshoping - remove acne, wrinkles, the person walking in the background I failed to notice etc. After that, I save the final images, and done. I recently watched a video of Zack Arias' workflow and was surprised that his workflow is almost identical to the way I've been doing it for a long time now. He utilizes one more program for loading/organizing his images on his hard drives, but then its into LR, a tad of PS, then done. For a more in-depth look at a similar workflow to mine, check out his video HERE. The nice thing about Zack posting his video is I don't have to do a video on it. Thanks Zack!! =)

Having said all of that, I'm continually looking for ways to be more efficient. So ask me again in 6 months, and its likely to be different.

Now, go out and shoot something!
March 19, 2010

Your Questions Answered: "What do you shoot with?"

© Todd Walker

I’ve gotten the question that every photographer asks every other photographer in the world: “What do you shoot with?” I really try hard not to make a big deal out of equipment. I don’t get into the Canon vs. Nikon, zooms vs. primes, blah blah blah. The reason is simple. I’ve seen images made with disposable 35mm film cameras that could run circles around some of the high-end pro cameras. To me the final image is the most important. When it comes right down to it, I couldn’t care less about what a person shoots with, so long as he or she is able to capture their vision. A good image is a good image. Period. The end. Game over. To read my opinion of essential gear, read this post HERE. At any rate, I’ve been asked the question so many times, I figure I’ll go ahead and answer the question. But I must warn you, you may be disappointed. My bag is far from glamorous.

What I use 99% of the time

Nikon D200 (you know, vintage)

Tamron 28-75 f/2.8

Nikon SB-800 (used for most of my portrait work)

(2) Pocket Wizard Plus II Transceivers (used to fire my flash)

(1) Light Stand

(1) Umbrella Adapter

(1) 45” Shoot-through Umbrella

Plus plenty of memory cards and batteries.

I also own, and use occasionally:

Nikon 18-200mm VR f/3.5-5.6 (used for a backup, and trips to the Zoo)

(3) Promaster 300ws studio strobes (inexpensive, but they get the job done)

(3) Light Stands

(2) 24x36” Softboxes

100ft extension cord

For most shoots, I can fit everything I need in a Tamrac 506, and carry a lightstand and umbrella. And that’s it. Is there gear out there I’d like to add to my bag? Sure. There’s some things out there that would help me fulfill my photographic vision. What would those things be? First and foremost, a new camera. Wait, what?!? What about all that “using your D200 till it dies talk in your essential gear post?” As I am beginning to shoot more and more weddings, I am finding I need a backup camera, for obvious reasons. Though my friends have been awesome about letting me borrow theirs for backups, having my own only makes sense.

Another thing I’d love to have is the ability to take my studio strobe on location, without the need to plug them in – ie, portable power. I’ve done amazing stuff with my SB-800, but to progress in my photographic vision, I’m needing more power. So I’m looking into that as well. I also wouldn’t mind having a wide angle prime lens, like the 20mm f/1.8 I borrowed from Nikki C. two weeks ago, and fell in love with. But for now, that’d be a luxury.

So for all you equipment geeks out there, there you go. But please, don’t go out and buy anything you see on my list thinking it will make you a better photographer. It won’t. The only thing that will make you a better photographer is you, not another piece of equipment.

Now, forget the equipment, and go out and shoot something!

February 27, 2010

Your Questions Answered...

© Todd Walker

The other day I was talking with a couple of photog friends of mine. One of them said, “hey, you should explain lighting ratios on your blog.” As we dove into the topic, I quickly realized how far removed I have become from text book, school-learnin’ photography. One of them is currently in photo school, and the other is fresh out of photo school. Topics like lighting ratios are fresh in their minds. Not so much in mine. They sort of ate my lunch on the topic.

Understanding lighting ratios can be very useful. They tell us how deep the shadows will be in a photograph. Different ratios communicate differently. Its a tough subject to both explain and to grasp. But I thought its a great topic for a post. So, I whipped out the ‘ol light meter, oiled the cogs in my brain, and went to work. You may have to read this post a couple of times to get it. But I’ll do my best to ‘slpain it to you.

For this post, I’m assuming you already understand f-stops and exposure, and how to use a light meter. I won’t go into all of that. But if you have any questions, feel free to leave a question in the comment section of this post, and you are always welcome to email me at todd@toddwalkerphotography.com.

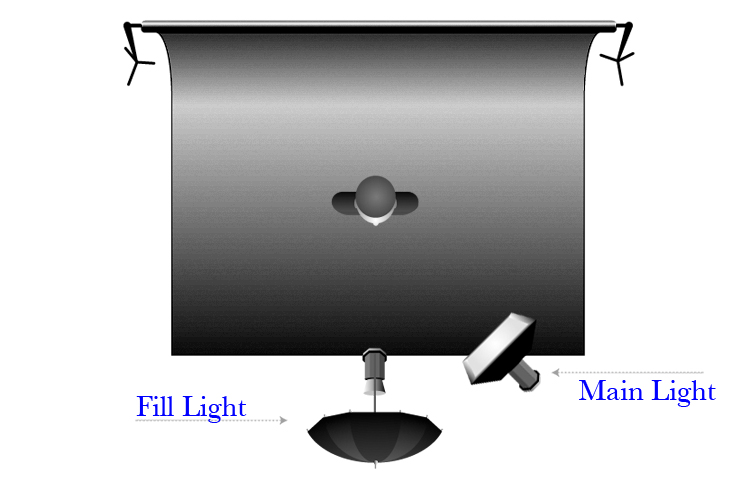
To explain how to calculate lighting ratios, we’ll be using a basic two-light portrait set up – main light positioned camera right and fill light positioned behind the camera. It looks like this:
© Todd Walker

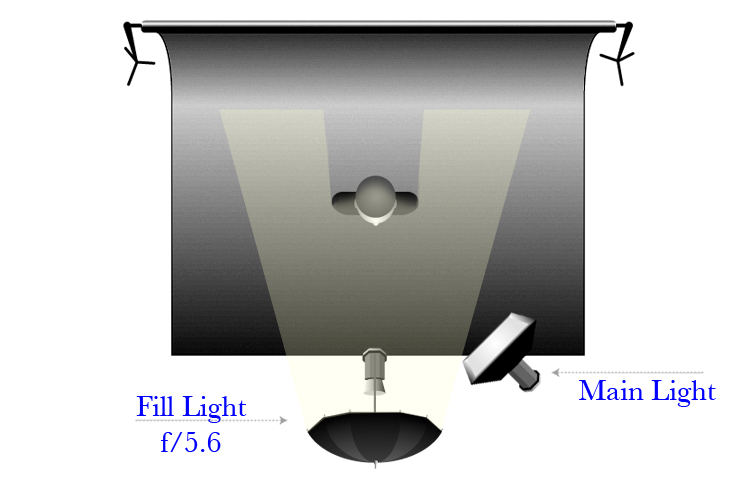
Let’s start by setting the Fill Light to f/5.6. By itself it would look like this:
© Todd Walker
This will give a reading of f/5.6 across the subject’s face. This would be a 1:1 ratio – both sides of the face will have the same amount of light. If we shot a picture with this one light, we’d set our camera’s aperture to f/5.6, take the shot and be done. Our lighting would be okay, but fairly flat since its coming directly from the camera. But we want more a more interesting image. We need to add some dimension to the subject. For that, we’re going to add a brighter light to the right, which will better shape the subject’s face. Soooo…

Let’s set the main light to f/8, which is one stop brighter than the fill. Using both lights together would look like this:

© Todd Walker

It is paramount to understand that each time the amount of light doubles, we’ve gained one stop of light. In other words, light increased by one stop is twice as bright. Two stops would be 4x brighter; three stops would be 8x brighter; four stops would be 16x brighter, and so on. This is key to understanding how to calculate lighting ratios. Our main light is coming from the right side, and not hitting the left side of the face. This ratio would read _:2 (2x brighter than the fill). The right side of the subject’s face already has light hitting it at f/5.6 from the fill light. And since our fill light has a ratio of 1:1, adding a second light that is twice as bright would give us a 1:3 ratio. Got that? 1+0=1 and 1+2=3, thus a 1:3 ratio. Feel free to go over that again =).

There’s a lot of misinformation out there on this subject. A lot of people call this a 1:2 ratio; thinking that since the main light is twice as bright, it simply gives us a 2 on the right side of the ratio. The confusion comes from not accounting for what the fill light will contribute to the right side of the subject. One way to get a 1:2 ratio would be to move the fill light to the left of the camera, so none of its light would hit the right side of the subject. Then, since no light would be contributing to the right side, it would be a simple 1:2 ratio. Another way to get a 1:2 ratio would be to leave the lights where they are, but set the main light to f/5.6, same as the fill. This would increase the amount of light on the right side by one stop (twice as bright). Then it would be a 1:2 ratio. Make sense? Feel free to read that paragraph through a few times as well =).

Back to our 1:3 ratio. . .

Now that we have our lights set up, lets set our camera. In this scenario we would set our aperture for the main light side of the face. Remember, we have to account for BOTH the main light AND the fill light. So, f/8 plus f/5.6 would give us a reading of f/9.5. Say what? Why not set our camera to f/11? Remember, a one stop increase is twice as bright. The main light is f/8. Then we are adding half as much light (f/5.6) to that, thus we get f/9.5. That’s half a stop between f/8 and f/11. Only if both lights were set at f/8 would the brightness be doubled and equal f/11. Since we are adding f/5.6 to f/8, we get f/9.5. So we set our camera to f/9.5. Yes, you can go over that paragraph a few more times as well. Equal sign right parenthesis.

Out on the street, I have developed a tried and true way for getting the proper ratio. I set up the first light and adjust it to the desired f-stop I want to shoot. Then, if the shadows are too dark, I might simply use a reflector to bounce light back into the shadow side of the subject. If that doesn’t do it, I’ll add a second light and adjust it until the shadows are at a level I want. That’s it. I very rarely even think about lighting ratios. I use the LCD and my E-Y-E. The only time I think about them is for cookie-cutter shots (proms, school photos, church directories, etc.). I remember from my schoolin’ days that a 1:1 ratio is flat. 1:3 is safe, suitable for cookie-cutter shots. A 1:5 ratio means drama. And 1:9 is the edge of darkness. For those jobs that require safe, traditional lighting, out comes the ol’ light meter. I set my lights one stop apart. Then bang away on the shutter button.

For example, I recently had a church directory shoot. I threw up a muslin background and a bsic two-light setup, like the one we've been using here. I set my main light to f/8. Then I set my fill light to f/5.6. Thats one stop difference, a 1:3 ratio. I set my aperture to f/9.5 and started to shoot. Setting up took me all of 15 minutes. (would've been 5 minutes had my softbox been more agreeable). Here's a look at the setup ::

© Todd Walker

(The room was so tight, I had to move the fill light over to the left so I could back up enough to take this shot. But I did move it back up and behind the camera).

And here's the boring, but safe and suitable result:

© Todd Walker

Is this the most amazing photo you’ve ever seen? Of course not. I don’t know any photographer who aspires to making church directory images. But they help pay the bills. As artists, we do everything we can to pay the bills. Even the less exciting, less creative assignments. We do what we HAVE to do, so we can do what we WANT to do.


So there you go. Everything you will ever need to know about lighting ratios. Okay, well, maybe not. But it’s a start. It all may seem like an overload. But it isn’t exactly rocket surgery we’re talking about here. And it sure as heck isn’t brain science. It may be difficult to understand, but we aren’t trying to cure heart disease. At the end of the day, we’re just taking pictures. If you’re new to this lighting stuff, don’t be afraid of it. Its just light. It won’t bite. And light that won’t bite is just right =P. We have an incredible amount of creative control when we control our lighting. Understanding lighting ratios is a good thing. But if all this stuff flies over your head, don’t worry. Your camera won’t blow up. Lighting ratios can be a useful tool, but being constrained by them will kill our creativity.

As I said earlier, if you have any questions about this, or anything photography related, please post them in the comment section below. Or feel free to e-mail me at: todd@toddwalkerphotography.com

Now, go out and shoot something!

February 19, 2010

Your Questions Answered...

Today's question is: "Is it better to under expose or over expose an image?" This is a great question. There is a lot of theories buzzing the web saying we should underexpose our shots by a stop or so. Let me begin by saying our supreme goal must be to nail our exposure. In fact, get a good exposure, listen carefully, and you might just hear angels singing.

Back in the slide film days, it was better to underexpose your shots. Though the frame would be a bit dark, you still had detail to work with. But if you overexposed it, the detail was lost. It was therefore common to underexpose your film by a half a stop or so, just to be on the safe side. This practice has carried over into the digital realm.

When shooting with a digital camera (particularly in JPEG), you have a small margin of error, much like slide film. Many photographers, therefore, adopted the practice of underexposing their shots, hoping to play it safe. But here’s the problem…in digital, if an image is underexposed, there are more dark areas in the image. Noise is most prevalent in the shadows. Annnnd if you lighten a dark image, you’ll be lightening the noise in the image. Then, when you get it to the proper exposure, will it look, well, noisy. On the other hand, if you overexpose the image, there is less noise recorded. Then when you darken it, you won’t be adding any noise, and the image will look cleaner. Therefore, if for some reason can’t nail the exposure dead on, and you have the choice, choose to overexpose the image. The end result will be much better. But again, the goal should always be to nail the exposure in camera.

Here’s a fun little exercise. To see the difference, try it out. Shooting in RAW, take two shots of the same scene. In the first, underexpose the shot by a stop or two. Then bring it back up when you process it. You’ll see how the noise in the shadows shows up as you lighten the image. In the second shot, overexpose the image just to the point of blowing out the highlights. Then bring it back down when you process the file. You’ll be amazed how clean your image is.

Now, go out and shoot something!

February 10, 2010

Your Questions Answered

© Todd Walker

Time for a “your questions answered” Friday. This week’s question comes from a friend of mine - Garrett D. from Springfield, Mo! I had the honor of shooting his senior photos last year. He’s quite the creative too. You can check out some of his stuff HERE.

The question is, “How do you photograph people?” This is such a great question.

Starting out, your photography may not be at a level you think it should. Then you see someone’s work that you really, really like. So you set out on a quest to shoot just like them. This is a very dangerous venture - for a couple of reasons. First of all, you never get the respect you deserve. Lets say you really admire the style of David Hill. You think his stuff is so sick you cry when you see it. And your work isn’t anything like his. So you decide to put in the effort. You begin to read everything you can about David Hill. You spend hours studying his images trying to gain insight into how he does what he does. You find tons of articles and webisodes explaining the “David Hill” lighting technique. You invest the time to mimic his lighting. After countless months of trial and error, you perfect his post production and photoshop skills. And finally you’ve got it. You have mastered the technique. You are starting to make some respectable images. You’re proud of what you’ve done. You decide to show off the fruits of your labor. You are glowing as you pull out your newly updated portfolio. You’re beaming with a sense of accomplishment. The person viewing your images is obviously awestruck. You couldn’t be happier. When they finish, they look up, and with a huge smile they say “wow, these look like they were shot by David Hill!” And there it is. Instead of your work standing on its own, all that time and effort was spent to simply look like someone else’s work. We would be much better off spending our time and effort developing our own style. One that people will recognize separately from everyone else’s. And a side note, personal style is not developed over weeks or even months. It takes years to develop.

There’s a second reason we shouldn’t aspire to shoot like someone else. Simply put: You have something to offer. We don’t need another David Hill in the world. We need you. You already have a very unique, distinct photographic style (or you’re in the process of developing it). Its easy, natural even, to look at another photographer’s images and want to shoot just like them. Though it may be beneficial to be inspired by and learn from others, we must resist the lure to replicate their work. Stay on that quest long enough, and you find you’ve put a ton of effort into creating images that aren’t yours. And that’s the last thing the world needs. We need what you have to offer. Without your unique contribution to photography, the industry as a whole suffers. So, you’re not at the level of David Hill, Jeremy Cowart, or Drew Gardner? Starting out, they weren’t either. But they put their efforts into their craft. And look what they contribute to the industry. Its not a cookie cutter approach to photography. So embrace where YOU are at, and commit to improving YOUR photography. And don’t worry so much about it. When it comes down to it, Like Zack Arias has said, “its not like we’re curing cancer. The only job that cures cancer is the job that cures cancer.” Take a deep breath, take a look around, and keep shooting. You’ll get there.

So how do you photograph people? My answer to this is actually very simple. You photograph people the way YOU photograph people. Whatever your personal photographic style is, keep doing that, just put a person in the shot. Its as easy as that. Do what you do, and add humans. But for Pete’s sake, don’t start shooting like everyone else. We need what you have to offer. And what you have to offer is worth so much more than cookie-cutter photography.

Now, go out and shoot something!