Showing posts with label Gear. Show all posts

April 7, 2010

Film vs. Digital


In this corner... As many of you know, I work part time at a pro camera shop in Tulsa. Since digital took over the photographic industry a few years ago, many people have crossed over kicking and screaming. Most of the apprehension towards digital is because of the idea that "film is better." Years ago, I agreed that digital would never come close to matching the quality of film. But, a few years ago its like they flipped a switch and **BAM** down goes film. The quality of a digital image became better than film, and has continued to improve since then. But telling this to the die hard film shooters is like telling Chicken Little the sky ISN'T falling. Am I saying people shouldn't shoot film? Absolutely not. I'm saying the image quality is better. But, if your vision in photography is best achieved shooting film, then digital would be a poor choice. What I am saying is digital is no longer a poor photographic medium. And to be shooting film because "film is better," is a misguided decision. Film is as good as it ever was. AND digital is even better, and continuing to improve. So, for the short time we still have film at our disposal, shoot whichever one fulfills your vision.


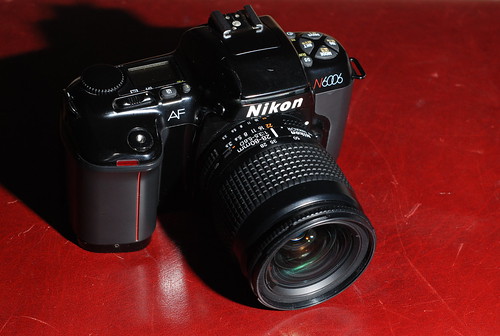
Years ago, I loved shooting film. But my first "professional" camera I bought during school was digital, and haven't shot any film since (about 4 years). Well, this past weekend I decided to shoot both film and digital. It was nothing official, just family snapshots over Easter weekend. I had a D200 set at ISO400, and a N6006 w/ 400 speed film. I didn't set out to compare the two. Rather, I simply wanted to shoot both mediums. I shot both available light and flash. After the weekend, here's a few thoughts about the two mediums.

First of all, digital is so much faster. Each day I was able to take my mem card, plug it into my mac, drag some sliders in lightroom, upload them to Facebook for the family to see, and done. I had to wait until Monday to have the film processed, scanned to cd, then into the computer, and here it is Wednesday and I still haven't had a chance to post them on Facebook.

One nice thing about film is it forced me to slow down. Getting in a hurry is my downfall. But having only 3 rolls of film for the entire weekend made me think about each shot, being sure every shot counted. And that was nice. With my D200, I cranked off too many poor shots.

But in the end, it all came down to the image quality. And for my style of shooting, its digital all the way. The dynamic range, detail, contrast, handling of noise (grain), and color were all far superior from my D200 than my N6006. After all these years, with many fond thoughts of shooting film, I gave it a go once again. But I discovered that my memories of film were somewhat fluffed up, romanticized. To give you an idea of how things came out, here's a couple of examples from the weekend.

AddisonFilm
This one is available light on film

AddisonDigital
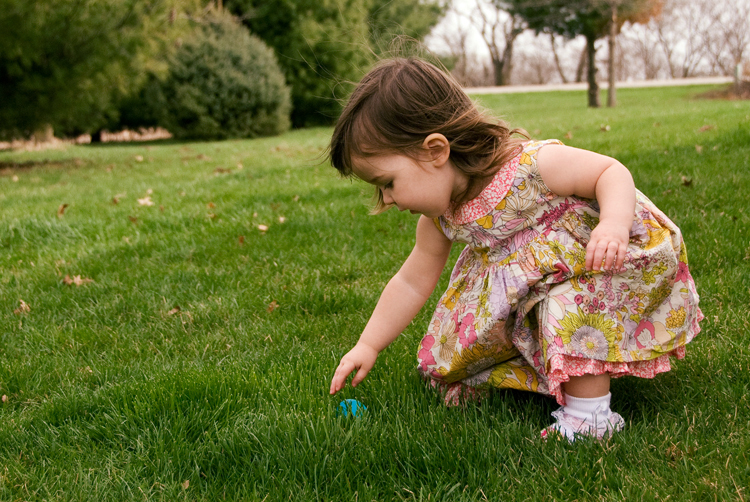
And a similar one in the same available light with digital

AndrewFilm
This shot is with an sb-800 light to balance the sky on film

AndrewDigital
And this is the exact same light and camera settings with digital

These images are not state fair ribbon winning photographs. But they were a couple of the best examples I had to show the difference between film and digital, in my experience. Over the weekend my aim was not to compare the two. But once I saw the difference, I had to share them. Perhaps one day I'll do a more "scientific" testing.

Film still has its place in the industry. There are many photogs out there making some pretty amazing images on film. And some are making serious bank doing so. So if that's you, awesome. Keep rippin' those rolls. If you're like me and shooting digital, awesome. Keep heating up those mem cards. But in either case, stop the debate over which is better. Both allow for amazing work and stellar images. So pick one and get out there and capture your vision.

Now, go out and shoot something!

March 24, 2010

Portraiture 101: Lenses

© Todd Walker

I seem to be coming across photogs out there that are confused about the same thing: which lens to use for portraits. As you all well know, I do not ascribe to this ideas that we need a new piece of equipment to be better photographers. Put simply, the number one thing new gear does for us is drain our bank account. If we would only understand the limitations of our gear, we could then maximize its capability. We must master the equipment we already own. But I digress. When it comes to shooting portraits certain lenses, more specifically, certain focal lengths are better than others.

If you don’t want to read the rest of the post, with all the ‘splainin’, here’s the short version: For the most flattering headshots, shoot with a focal length somewhere between 85-100mm. That’s it.

For the longer version, here we go… **big stretch**deep breath**and, go…

When it comes to portraiture, which focal length to choose depends on the type of shot you’ll be taking. If you plan on taking a tight, head-and-shoulders shot you will get the most pleasing results shooting somewhere in the 85-100mm range. Why is this? Can’t we get the same tight shot with a 50mm by just moving in closer? Well, yes and no. With a wider lens, you can move physically closer to your subject and achieve a similar composition. However, shooting in this manner will distort your subject’s face. The closer you get to your subject, the closer they are to the curvature of the front element of the lens. This will cause the subject’s nose/face to bulge, looking unnatural. Shooting between 85-100mm, we get the same tight composition, but we are further away from the subject. More importantly, the subject is far away from the curvature of the front element of the lens. This keeps the subject’s nose /face from bulging, and therefore looking natural.

What about shooting with a focal length longer than 100mm? Can’t we use a 300mm and just move back? Again, yes and no. Shooting with a lens longer than 100mm you begin to have the opposite effect. The more we zoom in on something the more it compresses the image. So, the further past 100mm you get, the more compressed your subject’s nose/face becomes, looking flatter than it should.

To put it another way, shooting with a focal length between 85mm and 100mm eliminates the unflattering facial distortion wide-angle lenses are notorious for, while avoiding the compression long telephoto lenses give.

So which is it? 85mm or 100mm? There’s a massive debate over that one. In my opinion, it doesn’t really matter. In my honest opinion, anywhere between 85mm and 100mm is pleasing for close-up portraits. What about using a prime lens or a zoom? The nice thing about zooms that incorporate the 85-100mm range is the flexibility to pick 85mm, 100mm or anywhere in between. Plus, you don’t have to move your tripod or model each time you recompose the shot. On the other hand, Prime lenses tend to be sharper than zooms, but you loose the flexibility. So, pick your poison.

Most entry-level SLRs come with an 18-55mm lens. If this is all you can afford, then simply stay away from tight headshots to keep from distorting your subjects. If, however, you need to shoot tight headshots (to fulfill your vision), and you can afford it (without going into debt), then consider another lens. The complimentary lens you can pick up for a modest investment is the 55-200mm for Nikon, and the 55-250mm for Canon. These are relatively inexpensive and incorporate the 85-100mm focal length.

Again, this is all applies to tight, head-and-shoulder shots. Anything other type of portrait (3/4 length, full length, wide environmental, etc), you can use just about any focal length you want. For all of you out there confused about focal lengths, I hope things are a bit more clear.

Now, go out and shoot something!

March 19, 2010

Your Questions Answered: "What do you shoot with?"

© Todd Walker

I’ve gotten the question that every photographer asks every other photographer in the world: “What do you shoot with?” I really try hard not to make a big deal out of equipment. I don’t get into the Canon vs. Nikon, zooms vs. primes, blah blah blah. The reason is simple. I’ve seen images made with disposable 35mm film cameras that could run circles around some of the high-end pro cameras. To me the final image is the most important. When it comes right down to it, I couldn’t care less about what a person shoots with, so long as he or she is able to capture their vision. A good image is a good image. Period. The end. Game over. To read my opinion of essential gear, read this post HERE. At any rate, I’ve been asked the question so many times, I figure I’ll go ahead and answer the question. But I must warn you, you may be disappointed. My bag is far from glamorous.

What I use 99% of the time

Nikon D200 (you know, vintage)

Tamron 28-75 f/2.8

Nikon SB-800 (used for most of my portrait work)

(2) Pocket Wizard Plus II Transceivers (used to fire my flash)

(1) Light Stand

(1) Umbrella Adapter

(1) 45” Shoot-through Umbrella

Plus plenty of memory cards and batteries.

I also own, and use occasionally:

Nikon 18-200mm VR f/3.5-5.6 (used for a backup, and trips to the Zoo)

(3) Promaster 300ws studio strobes (inexpensive, but they get the job done)

(3) Light Stands

(2) 24x36” Softboxes

100ft extension cord

For most shoots, I can fit everything I need in a Tamrac 506, and carry a lightstand and umbrella. And that’s it. Is there gear out there I’d like to add to my bag? Sure. There’s some things out there that would help me fulfill my photographic vision. What would those things be? First and foremost, a new camera. Wait, what?!? What about all that “using your D200 till it dies talk in your essential gear post?” As I am beginning to shoot more and more weddings, I am finding I need a backup camera, for obvious reasons. Though my friends have been awesome about letting me borrow theirs for backups, having my own only makes sense.

Another thing I’d love to have is the ability to take my studio strobe on location, without the need to plug them in – ie, portable power. I’ve done amazing stuff with my SB-800, but to progress in my photographic vision, I’m needing more power. So I’m looking into that as well. I also wouldn’t mind having a wide angle prime lens, like the 20mm f/1.8 I borrowed from Nikki C. two weeks ago, and fell in love with. But for now, that’d be a luxury.

So for all you equipment geeks out there, there you go. But please, don’t go out and buy anything you see on my list thinking it will make you a better photographer. It won’t. The only thing that will make you a better photographer is you, not another piece of equipment.

Now, forget the equipment, and go out and shoot something!

March 10, 2010

Memory Cards: Speed & Class 'splained

© Todd Walker

So you have a camera. It takes a memory card. So which one should you choose? What’s with all this class and MB/s mumbo jumbo? There’s a ton of confusion out there on the subject. Today we’ll look at memory card performance and how it helps us get the most out of our SLRs. An important thing to note is SD cards are the only ones to include both speed and class on the face of the card. Compact Flash and Memory Stick cards only refer to speed, and not class.

SD memory card performance is measured in one of two ways: speed, known as megabytes per second (MB/s), and class (C2, C4, C6, etc.). Understanding the difference of these measurements is often misunderstood, but essential in selecting the card that will best suit your needs.

Speed refers to continuously shooting still images in the burst mode. The speed rating (i.e., 30MB/s) designates the maximum sequential speed that data can be written to the memory card and transferred to a host device. This is also known as “read/write speed.” Lets say you have a card that has a speed of 30MB/s. This means the card will read/write up to but no faster than 30MB/s. The faster the card, the less lag time between frames during continuously shooting in burst mode on cameras that shoot at high frame rates. What’s a high frame rate? Usually a camera that shoots 5 frames per second or higher is considered a high frame rate.

Class refers to recording video. The class rating (i.e., C2, C4, etc.) designates the minimum sustained speed required for recording a constant rate of video onto the card. A card’s class rating corresponds to the minimum guaranteed data transfer rate megabytes per second. This means the card will record video no slower than xMB/s. For example, Class 4 cards are designed for a minimum sustained transfer rate of 4MB/s, while Class 10 cards are designed for a minimum sustained transfer rate of 10MB/s.

Cameras have the ability to record images in bursts up to 10 frames per second. This floods the card with a massive amount of data in an instance. These cameras demand high-performance memory cards with fast maximum write speeds. Current SLRs can produce huge files in either RAW, JPEG, or both. And RAW files can reach upwards of 20mbs. The larger the stream of data being crammed onto a card, the faster the write speed must be in order to handle the load. If a card is too slow, then shooting will pause until the card catches up to the camera, at which point shooting will resume. This lag causes missed shots, which isn’t good. But if a card is fast enough, the camera can shoot non-stop at its fastest frame rate until the card is full. So for fast shooting, a fast card is needed.

If you want to capture high megapixel still images at a fast frame rate? Then you need a card with a maximum write speed fast enough to meet your shooting requirements. Have an entry level SLR (which only shoots around 3-4 frames per second)? Then skip the high-speed cards. But if you have a more advanced camera and intend to shoot faster burst rates (say 5 frames per second and faster), in RAW format, then you will need a fast memory card. Rather than simply choosing the highest performing card in the store, you have to determine what type of shooting you’ll be doing. Then we can select the card that meets your shooting requirements.

Like it or not, we are merging photography and video. Today, most SLRs have the ability to shoot high frame rates and record HD video. And if we are going to be utilizing both, we’ll need memory cards that accommodate both mediums. If the card offers fast maximum write speeds but only a Class 2 rating, then it won’t be fast enough to record in HD. Also, if the card has a Class 6 rating but a slow write speed, then it will suffer a lot of lag when shooting in burst mode.

Again, this only applies to SD cards. If you’re shooting higher end SLRs, you only use Compact Flash cards. Then you only have to worry about speed. If you’re shooting sports, then you need fast cards. If you’re shooting portraits, then maybe not. And what about which brand to choose? Well, I use Promaster brand memory cards. The reason I choose them is twofold. 1) they have a lifetime warranty. If one ever fails, it gets replaced. In 3 years of hardcore shooting, I’ve only had one fry on me. Pretty good in my book. 2) I get a decent price on them at he pro camera shop I work part time at. I know, not nearly as romantic. But it’s a valid reason nonetheless. And to be fair, even if I didn’t work there and get the discount, I’d still choose them because they’ve been so reliable.

So there you go. Class and Speed ‘splained. Hope it helps. Happy shooting everyone

Now, go out and shoot something!

February 17, 2010

QUALITY OF LIGHT ~ Specular / Defuse

© Todd Walker
Whether you use the sun or a flash, as a photographer, understanding light will be a lifelong pursuit. You could study from sun-up to sun-down everyday till your grandkids have grandkids, and you’d still have a lot to learn about light. Albert Einstein once said he could spend his entire life trying to figure out what light is (loose paraphrase). I'm not an expert on lighting. And there are volumes upon volumes of books written on the subject of lighting. There are plenty of photographers out there who put my lighting skills to shame. But, for the sake of the industry, and for those of you reading this, I’m going to share a little bit of what I know about light. Hopefully you can gain something and be able to use it in your own pursuit of photography.

Without light, there is no photograph. The word itself literally means “light drawing” – “photo”=“light” and “graph”=“drawing”. What separates a great photograph from a mediocre one? The quality of light. The subject in the photograph may help a little, but the true difference will always be lighting. You can take two photographs of the same subject, one poorly lit, and the other well lit. The outcome will be completely different. Same subject, same pose, one looks awesome, and one looks like it needs a courtesy flush. The great Joe McNally says “Light speaks, just like language. You can make someone look like an angel, or the devil.” Light allows you to bring your vision into being. Light is photography. Not Nikon or Canon, not Photoshop or Lightroom, not actions or presets. Burn it into your brain. Photography is light. Light is photography. And recognizing good light will be the single greatest advancement one can have as a photographer. Some have the God-given ability to recognize it. Others have to work hard at learning to see it. And we all would do well to spend our time learning to see and use good light.

So what is good light? Well, good light is . . . relative. That’s right, no silver bullet here. Good light is completely dependant on the vision you have for your subject. Say you want to shoot a beautiful portrait of a woman. You want the shot to be soft, airy, serene. You will never get that shot if you are using is harsh, contrasty light. Or say you envision something edgy, dark, and dramatic. Won’t happen if your light is soft and creamy. We need to understand light. Not megapixels. Not Brands. Not bokah. Lets say it again class: Light is photography. Photography is light.

To understand how to capture our vision, we must first understand a couple of different qualities of light. The first quality of light is known as specular light. Specular light is what gives us high contrast and sharply defined shadows. Its often referred to as harsh light. Specular light comes from a very small light source. Think of a flashlight. If you are in a dark room and turn on a flashlight, you get a lot of contrast and well defined shadows. Another example is the noon-day sun on a clear day. The sun is relatively small, a mere dot in the sky. And from that small light source, you get lots of contrast and crisp black shadows on the sidewalk. To achieve harsh, contrasty light with well defined shadows, you need a specular light source. The light needs to be tiny.

The second quality of light is known as defused light. Defused light is what gives you the creamy light with low contrast and very soft shadows. Its often referred to as soft light. Defused light comes from a very large light source. Think of a picture window. If you are in an otherwise dark room and the daylight comes in though a picture window, you get low contrast and soft shadows. Another example is the noon-day sun on an overcast day. The sun is illuminating the clouds and thus the entire sky is the light source. The light source is relatively huge. And from that light source, it gives very low contrast and extremely soft shadows. To achieve soft creamy light with soft shadows, you need a defused light source. The light needs to be huge.

One thing to mention here is the brightness, or luminance. Brightness has no effect on whether the light is specular or diffused. Think of it this way. In a pitch black room, light a single candle. This is a very small light source. It is also very dim. Now, in the same pitch black room, turn on one of those LED key-chains. You know the ones that have a single LED sticking out so you can see a keyhole better. Its about the same size as a candle flame. But it is much brighter. And both create very high levels of contrast and deep black shadows. Their brightness levels are very different, and they will illuminate a subject to very different degrees. However, since they are both very small, they are very specular in nature. So again, it is the SIZE of the light source that determines specular or diffused light. Not the brightness.

Now, the quality of light ranging between specular and defuse is a sliding scale. Its not an “either/or” option. But knowing the differences between the two extremes is a great place to begin. Say you’re shooting outside on a sunny day. You want the light on your subject to be softer than what the sun is giving you. You know you need to diffuse the light a bit. The sun is a small light source (specular), and to diffuse it you have to make it larger. So how do you make the sun larger? By cheating. A handy thing to have in your bag is a large 5-in-1 reflector. One of the “colors” in the reflector is translucent. You can place this between the sun and your subject. The translucent reflector is illuminated by the sun which now becomes your light source. And the reflector, being much closer to your subject, is relatively much larger than the sun (The bare sun is a small dot, the reflector is several inches across). You have re-created a similar effect to an overcast sky. You now have made the light on your subject softer. It may not be as soft as if it were actually overcast, but it’s a heck of a lot better than direct sunlight. Now, am I saying everyone needs to have a 5-in-1 reflector? Not at all. I’ve used one a total of one time. It simply doesn’t help me achieve my photographic vision. But if it would help you achieve your vision, then by all means, use it. This is simply one scenario and one solution. You get the idea. Have a vision. Assess the situation. Set it up. Press the button.

Today, I have a homework assignment for you. Go to any of the mass photo sharing websites out there (my favorite is www.photo.net). Once you’re there, take some time looking at the type of photos you enjoy. I like portraiture. As you look through them, you’ll come across those that stop you in your tracks. When that happens, don’t just move on. Take the time to study those images. What made you stop and take a longer look? Why do you like it? What type of light did they use? Specular or defused? Then post a comment her on the blog with a link to the image and let us know your thoughts on it.

Now, go out and shoot something!

February 10, 2010

Essential Gear

© Todd Walker

We live in a time when gadgets have become essential to our everyday existence. Televisions, computers, cell phones, ipods – we all have them. Most of us are addicted to them. Don’t believe me? Take any one of those devices and give it up for a week. Most of us wouldn’t last one day. I’m not saying these things are wrong or evil. Many of these things are a must to carry out the functions of everyday life. Most of us need a cell phone to stay connected to others, or listen to music to stay focused, or use computers to, well, do nearly everything in our business.

“Where you going with this Todd?”

Look, lets be honest. Many of these gadgets are essential. However, many of us get caught up in thinking our gadget isn’t good enough – that we need the latest in order to function properly. I may need a cell phone, but do I need a new iphone 3Gs when the 3G is doing everything I need it to? New bells & whistles are great, until you realize you’re broke, the bells are annoying and you really don’t know how to whistle.

The same is true in photography. There are several pieces of equipment we must have to create images. But it seems every day there’s a new improved camera, lens, image software, lighting rig, widget and what-have-ya. The new gear promises to make you a better photographer. The truth is, however, only YOU can make you a better photographer. You are the one who has to have vision. You are the one who has to think it through. You are the one who has to work out the shot. When it comes to essential gear, YOU are the single most important component on any assignment. Concerning photography, you must be your single biggest investment. Do everything you can to hone your skills as a photographer. Read what you can. Learn as much as possible. Shoot more than possible. Mess up. Learn from it, and try it again. Meet with other photographers. Get involved in open forums, comment on blogs. Heck, start a blog. Whatever you do, put a much greater importance on developing your skills and vision as a photographer than on your gear. David duChemin has a mantra I think needs adopting by many of us: “Gear is good; vision is better.” Don’t focus on the gear. Focus on your vision. YOU are what makes killer images, not your gear – period, the end.

Only have an old hand-me-down camera that’s nearly worn out? Finish the thing off. Bought an off-brand flash on ebay? Rock it ‘till it melts. Stuck with an 18-55, non-IS kit lens? Figure out how to put the rest of us to shame with it. Still using Photoshop Elements to fix everything? For Pete’s sake, start nailing your images “in camera,” and stop having to “fix” everything later. Then you may not even need Photoshop.

For years I had it backwards. I got caught up in thinking “if only I had this camera, that light, or the other lens, then I would get better images.” Believe me, the “better” gear does not make you a better photographer. That said, different gear may help us achieve our vision easier. You see, once you begin to invest in yourself, your skills improve. When your skills improve, you begin to develop your style. As your style emerges, you might realize you can’t achieve your vision with your current equipment. Then and only then should we start looking at new gear. Many people barely know how to use the stuff they have before they want something different. If we would simply understand the limitations of the gear we have, we could then maximize its capabilities, and realize we probably don’t need the shiny new stuff. Now, if the gear you have can’t deliver what your vision demands, then its time to look at something new. But that should be the order. Vision first, gear second. An ancient prophet once said “without vision, the people will perish.” The same is true in our craft. If we get caught up in gear and never cultivate our vision, we end up with the same level of images – and a very heavy equipment bag. And we’re broke.

This post may not be what you were expecting. You may have been expecting me to tell you to buy the new Nikon D5s mark II with the DX 12-2400mm f/1.2 lens, a half dozen SB-580 EX IIIs, some Wizard Poppers and Photoshop CS9. You may have wanted me to tell you about the secret piece of gear that will magically make it all better. If so, then I’m sorry to break it to you. Gear won’t make it better. What does it take to make killer images? You. Only with hard work, determination, and a passionate commitment will we become better at your craft. Invest in yourself and master the gear you already have.

I feel I still have a long way to go in my own photography. I only have 40,000+ clicks on my three-year-old D200. Which means I have a lot of mileage left on it. And I plan to get the most out of every mile left on that thing. Maybe by then my skills and vision will demand a replacement. Until that happens though, you’ll see me out there rockin’ my “vintage” D200.

Anyone care to join me?

Now, go out and shoot something!